GitHub CI Checks
GitHub CI checks help maintain code quality and prevent bugs from reaching production.
Configure them to support your team’s workflow and quality standards.
What are GitHub CI Checks?
GitHub CI Checks are automated quality gates that run on your pull requests and commits. TestDino GitHub Checks show a clear pass or fail signal in GitHub based on the test rules you set in TestDino. If a required check fails, GitHub will block the merge.
-
When your tests finish, TestDino compares the run against your quality gate settings.
-
It then posts a green check ✅ (passed) or a red check ❌ (failed) directly on the PR or commit.
-
This gives your team fast feedback on whether the code meets your quality standards.
Why do CI checks matter?
-
Stop unstable or failing code from being merged
-
Enforce strict rules for critical branches (like main)
-
Use different rules for PROD, STAGE, and DEV
-
See failures instantly inside GitHub
-
Combine real test signals with GitHub’s protection rules
Quality Gate Settings
These rules determine whether TestDino marks a check as pass/fail.
1. Default Settings
By default, the Pass % and Flaky settings apply to all branches.
You can override them later for specific environments such as PROD, STAGE, or DEV.
2. Pass Rate
Minimum percentage of tests that must pass for the check to succeed.
-
Range: 0-100%
-
Default: 90%
-
Example: If set to 90%, at least 90% of your tests must pass for the check to be green
3. Mandatory Tags
All tests with these specific tags must pass. If even one fails, the entire check fails, regardless of the overall pass rate.
If any test with a mandatory tag fails, the entire check fails
-
Use the
@prefix (for example@critical,@payment,@auth) -
If even one test with a mandatory tag fails, the entire check fails
-
Useful for login, payments, security, or any flow that you cannot risk breaking
Example:
If you set @critical as mandatory and one critical test fails, the check is red even if everything else passes.
4. Flaky Handling
How flaky tests are treated:
1. Strict
-
Flaky tests count as failures.
-
Use this for production branches where stability is critical
2. Neutral
-
Flaky tests are excluded from the pass rate calculation (default).
-
Use this for development branches to focus on actual failures
Environment Overrides
You can create different quality gates for different environments.
How does it work?
-
Set up branch environments in your project (such as Production, Staging, and Development).
-
Each environment appears as a row in the CI Checks settings table.
-
For each environment, set a custom Pass %, Flaky Handling, and whether Tags apply.
-
If you do not override a setting, the default applies.
Example Configuration
| Environment | Pass Rate | Flaky Handling |
|---|---|---|
| Default | 80% | Neutral |
| Development | 70% | Neutral |
| Staging | 85% | Neutral |
| Production | 95% | Strict |
What this means:
-
Development: Only 70% of tests need to pass. Flaky tests don’t matter.
-
Staging: Needs 85% passing. Good for pre-deploy testing.
-
Production: Strictest rules. Needs 95% passing and no flaky failures.
-
All other branches: Follow the default 80% rule.
This gives you full control over different parts of your workflow.
Understanding Check Results
Each GitHub check will show green or red based on your rules.
1. Passed: Green Check ✅
Your code meets all quality gate requirements:
- Pass rate meets or exceeds the threshold
- All mandatory tag tests passed
You can merge your PR!
2. Failed: Red Check ❌
Your code doesn't meet quality gate requirements because:
- Pass rate is below the threshold, OR
- One or more mandatory tag tests failed
Fix the failing tests before merging.
Check Details
Click "Details" on the GitHub check to see:
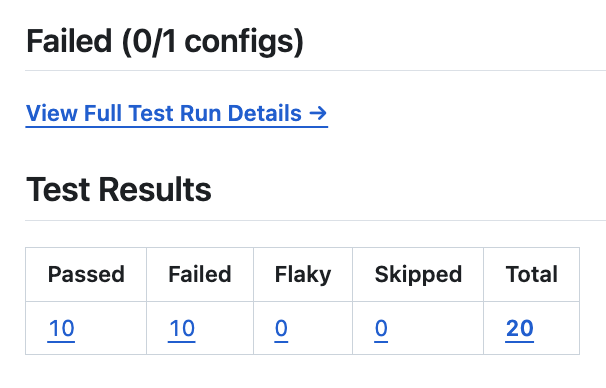
1. Test Results Table
Quick overview with clickable links to your TestDino dashboard.
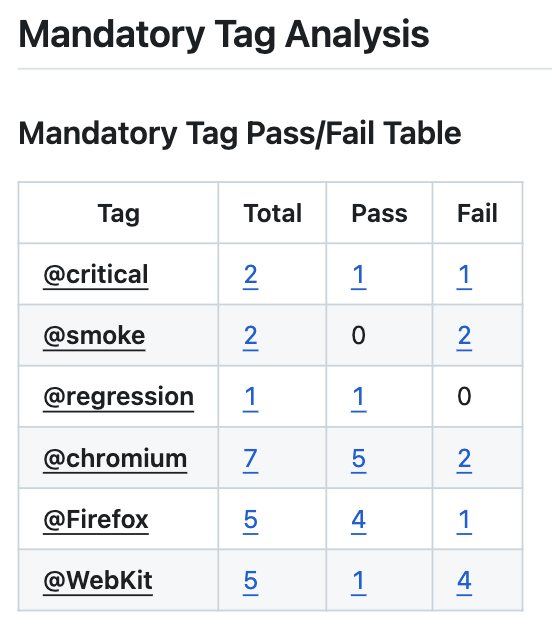
2. Mandatory Tag Analysis
Shows which mandatory tags passed or failed.
3. Tags Not Found
If you configured a mandatory tag that doesn't exist in your tests.
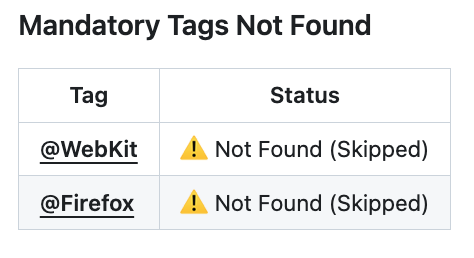
Note: Tags not found don't fail the check - they're skipped.
Making CI Checks Required
This step tells GitHub which checks must pass before a pull request can be merged.
-
Go to Repository Settings → Rulesets
-
Create or edit a rule
-
Enable Require status checks to pass
-
Click Add checks
-
Select TestDino
-
Set target branches (for example, main)
-
Save the rule
When you open the Require status checks to pass section, you’re choosing the exact checks GitHub should enforce.
GitHub will now stop merges unless the TestDino CI Check is green.
Common Scenarios
1. High Pass Rate, but the Check Failed
Situation: 95% of tests passed, but the check is still red.
Reason: A mandatory tag test failed.
Solution:
-
Fix the mandatory tag test first.
-
Mandatory tags override the pass rate completely.
2. Flaky Tests Causing Failures
Situation: Check fails because flaky tests are counted as failures.
Solution:
-
Switch the environment to Neutral flaky handling, or
-
Fix the flaky tests, or
-
Use Strict only on stable branches like Production
3. Different Rule Requirements by Branch
Situation: You want strict rules for Production but lighter rules for Development.
Solution: Use Environment Overrides:
-
Development: 70% pass rate, Neutral flaky handling
-
Production: 95% pass rate, Strict flaky handling
Best Practices
1. Start with Reasonable Defaults
-
Begin with an 80-90% pass rate
-
Use Neutral flaky handling initially
-
Add mandatory tags only for truly critical features
2. Use Mandatory Tags Wisely
Apply mandatory tags to tests that cover:
-
Critical user flows (login, checkout, payment)
-
Security features (authentication, authorization)
-
Data integrity operations
Don't overuse - if everything is mandatory, nothing is.
3. Configure Environment-Specific Rules
-
Production: Strict rules (95%+, strict flaky handling)
-
Staging: Moderate rules (85-90%)
-
Development: Relaxed rules (70-80%, neutral flaky handling)
4. Review Failed Checks Promptly
-
Failed checks block your PR for a reason
-
Review the failed tests in the check details
-
Click through to the TestDino dashboard for full error details
5. Keep Tests Stable
-
Fix flaky tests instead of just ignoring them
-
Flaky tests indicate underlying stability issues
-
A reliable test suite gives you confidence in your checks
Troubleshooting
1. Check Not Appearing on PR
Possible causes:
-
GitHub Checks are not enabled in settings
-
No commit SHA available in test run metadata
-
Repository mismatch between the TestDino project and the GitHub connection
Solution: Verify GitHub connection and ensure CI Checks are enabled.
2. Check Always Failing
Possible causes:
-
The pass rate is set too high
-
Mandatory tags not properly configured
-
Flaky handling is too strict
Solution: Review your quality gate settings and adjust thresholds.
3. Mandatory Tags Not Working
Possible causes:
-
Tag names don't match (case-sensitive)
-
Missing @ prefix in test tags
-
Tests don't actually have the tags
Solution:
-
Check tag spelling and case
-
TestDino automatically adds @ if missing, but verify in your tests
-
Review the "Tags Not Found" section in the check details
4. Environment Override Not Applied
Possible causes:
-
The branch pattern doesn't match
-
Environment not configured in project settings
Solution: Verify branch environment mapping in project settings.