> ## Documentation Index
> Fetch the complete documentation index at: https://docs.testdino.com/llms.txt
> Use this file to discover all available pages before exploring further.
# Generate TestDino API Keys
> Create and manage API keys for uploading Playwright test results.
**What you'll learn**
* How to generate and configure API keys
* How to rotate and revoke keys securely
* How to store keys as CI secrets
Every TestDino integration — CLI uploads, Public API calls, Azure DevOps — authenticates with a scoped credential. This guide shows how to create, rotate, and securely store **API Keys** for test reporting and **Access Tokens** for Public API access and external integrations.
The API key is the first step of setup. Create it here, then install a [reporter](/cli/overview) to upload from your machine or wire it into [CI](/guides/ci-setup-overview) to upload on every run. For first-time setup, create an **API Key** (test reporting) — the Access Token is only for the Public API and external integrations.
## Create a Key
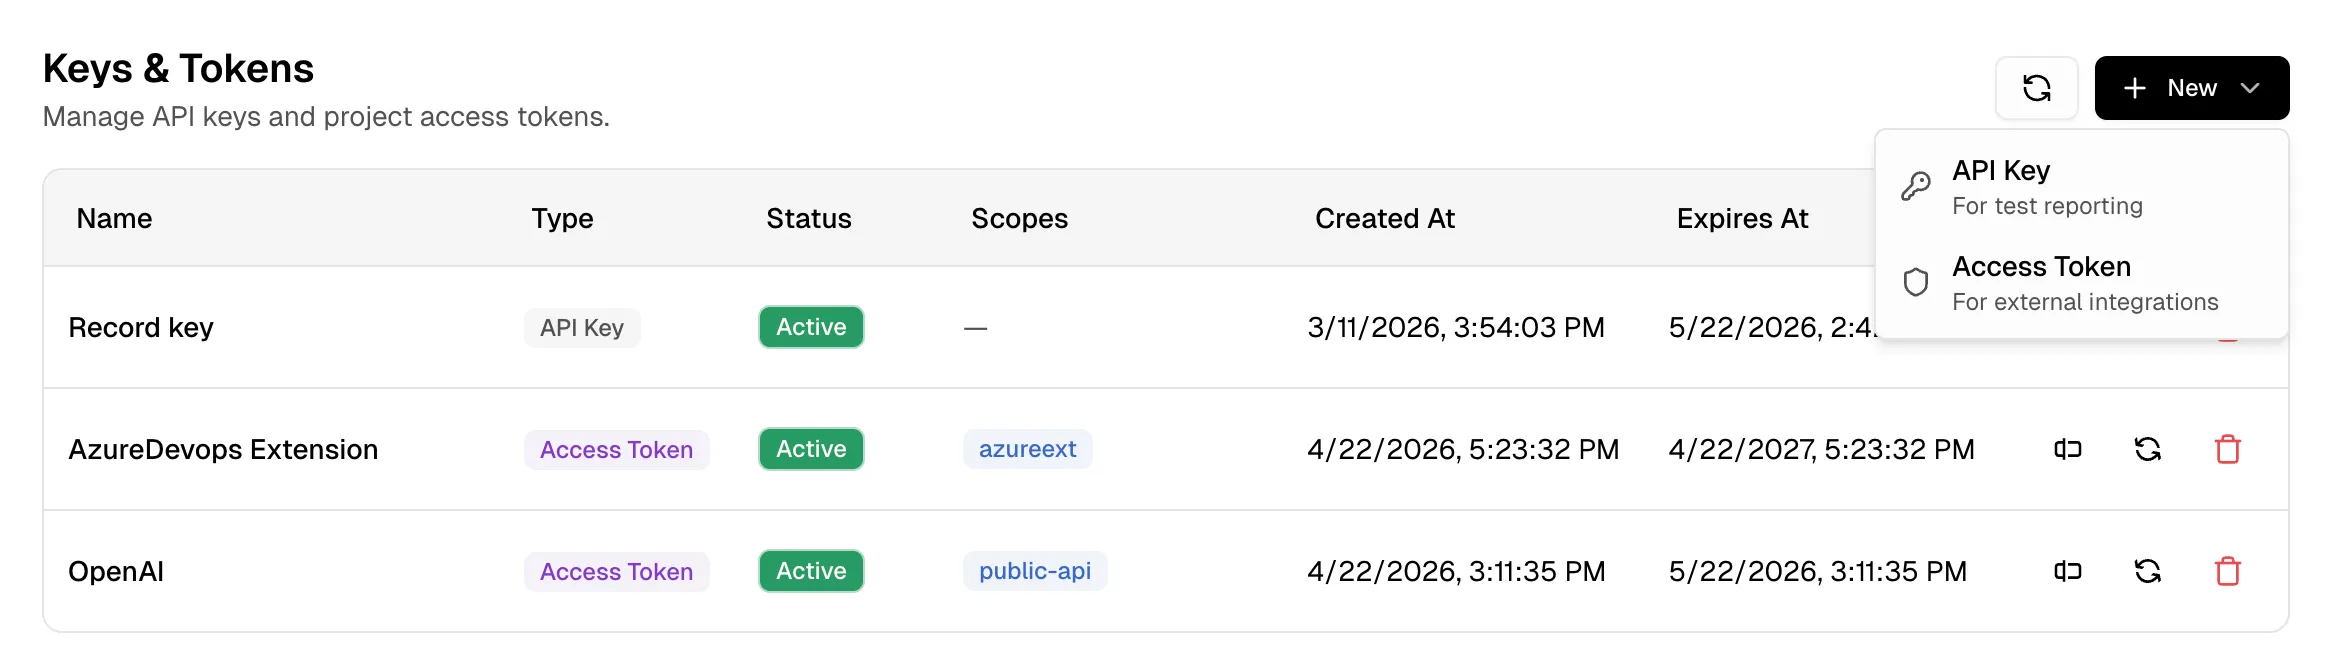 TestDino issues two credential types from the same place. Pick the one that matches what you're doing:
| Credential | Use it for | Where it's used |
| :--------------- | :------------------------------------------ | :------------------------------------------- |
| **API Key** | Uploading Playwright test results | CLI uploads (Node.js / Python), CI pipelines |
| **Access Token** | Public API access and external integrations | Public API v1, Azure DevOps Extension |
Both live on the project — not the organization. Open the project first, then go to **Project Settings → API Keys** tab → **Keys & Tokens** section. Each credential is shown only once at creation.
**Project vs Organization settings**
Organizations have their own Settings page (billing, members, etc.), but API keys and Access Tokens always belong to a single project. If you don't see the **API Keys** tab, you're likely in Org Settings — navigate into a project first.
### Token prefixes
Every credential carries a prefix that identifies its type. Check the prefix to confirm you are using the right token for the surface.
| Prefix | Token type | Scope | Accepted by |
| :----- | :------------------- | :---------------------------------------- | :------------------------------------------------- |
| `tdp_` | Project Access Token | Project-scoped (`public-api`, `azureext`) | Public API v1, Azure DevOps Extension, CLI uploads |
| `tpu_` | User Access Token | User-scoped | MCP and in-app contexts. Rejected by Public API v1 |
Public API requests must use a `tdp_` token in the header: `Authorization: Bearer tdp_...`. A `tpu_` token returns an authorization error on Public API v1. User tokens are created from your user settings and are used by the [MCP integration](/mcp/remote), not from the project API Keys tab.
### API Key (test reporting)
Use this for the CLI uploaders that send Playwright reports to TestDino.
1. Open your project in TestDino
2. Go to **Project Settings → API Keys** tab
3. In the **Keys & Tokens** section, click **+ New → API Key**
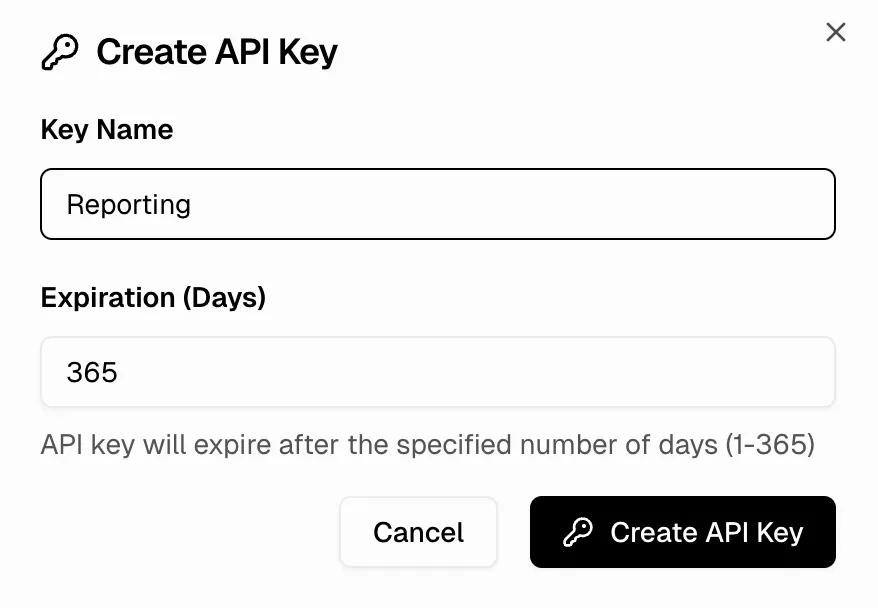
4. Enter a **Key Name** and **Expiration** (1 to 365 days)
5. Click **Create API Key**
TestDino issues two credential types from the same place. Pick the one that matches what you're doing:
| Credential | Use it for | Where it's used |
| :--------------- | :------------------------------------------ | :------------------------------------------- |
| **API Key** | Uploading Playwright test results | CLI uploads (Node.js / Python), CI pipelines |
| **Access Token** | Public API access and external integrations | Public API v1, Azure DevOps Extension |
Both live on the project — not the organization. Open the project first, then go to **Project Settings → API Keys** tab → **Keys & Tokens** section. Each credential is shown only once at creation.
**Project vs Organization settings**
Organizations have their own Settings page (billing, members, etc.), but API keys and Access Tokens always belong to a single project. If you don't see the **API Keys** tab, you're likely in Org Settings — navigate into a project first.
### Token prefixes
Every credential carries a prefix that identifies its type. Check the prefix to confirm you are using the right token for the surface.
| Prefix | Token type | Scope | Accepted by |
| :----- | :------------------- | :---------------------------------------- | :------------------------------------------------- |
| `tdp_` | Project Access Token | Project-scoped (`public-api`, `azureext`) | Public API v1, Azure DevOps Extension, CLI uploads |
| `tpu_` | User Access Token | User-scoped | MCP and in-app contexts. Rejected by Public API v1 |
Public API requests must use a `tdp_` token in the header: `Authorization: Bearer tdp_...`. A `tpu_` token returns an authorization error on Public API v1. User tokens are created from your user settings and are used by the [MCP integration](/mcp/remote), not from the project API Keys tab.
### API Key (test reporting)
Use this for the CLI uploaders that send Playwright reports to TestDino.
1. Open your project in TestDino
2. Go to **Project Settings → API Keys** tab
3. In the **Keys & Tokens** section, click **+ New → API Key**
4. Enter a **Key Name** and **Expiration** (1 to 365 days)
5. Click **Create API Key**
 ### Access Token (Public API & integrations)
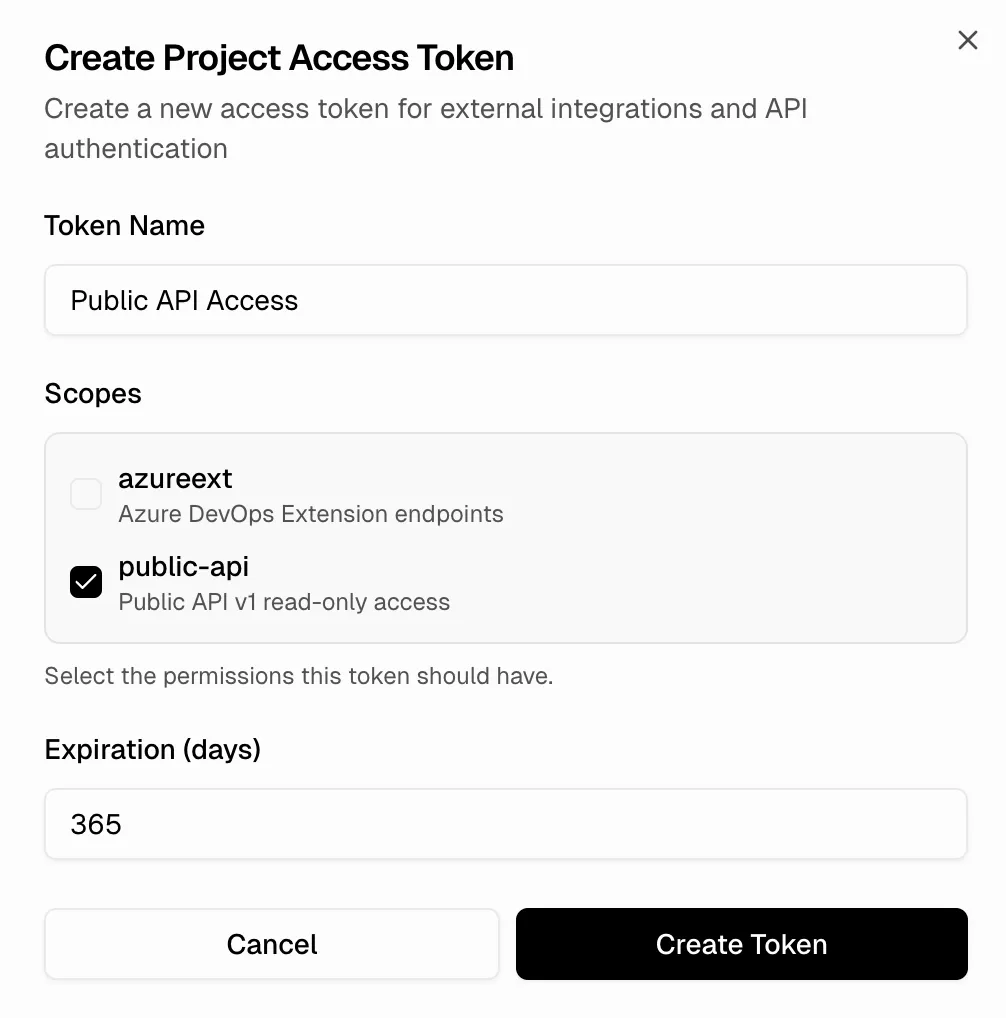 Use this for the [Public API](/api-reference/overview) or external integrations like the Azure DevOps Extension.
1. Open your project in TestDino
2. Go to **Project Settings → API Keys** tab
3. In the **Keys & Tokens** section, click **+ New → Access Token**
4. Enter a **Token Name**
5. Select **Scopes** — `public-api` for Public API v1 read-only access, `azureext` for the Azure DevOps Extension
6. Set **Expiration (days)** (1 to 365 days)
7. Click **Create Token**
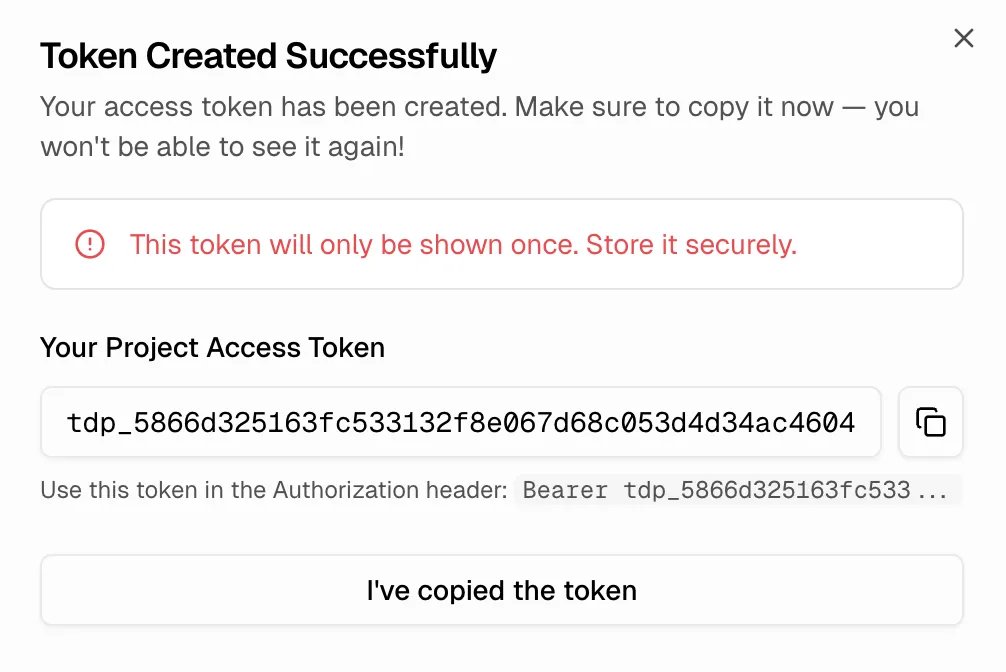
The credential is automatically copied to your clipboard. Store it in a password manager or your CI secrets — it's shown once and cannot be retrieved later.
Use this for the [Public API](/api-reference/overview) or external integrations like the Azure DevOps Extension.
1. Open your project in TestDino
2. Go to **Project Settings → API Keys** tab
3. In the **Keys & Tokens** section, click **+ New → Access Token**
4. Enter a **Token Name**
5. Select **Scopes** — `public-api` for Public API v1 read-only access, `azureext` for the Azure DevOps Extension
6. Set **Expiration (days)** (1 to 365 days)
7. Click **Create Token**
The credential is automatically copied to your clipboard. Store it in a password manager or your CI secrets — it's shown once and cannot be retrieved later.
 ## Use your API key
Pass the key to the CLI with the `--token` flag:
```bash theme={null}
npx tdpw upload ./playwright-report --token="your-api-key"
```
Or set it as an environment variable:
```bash theme={null}
export TESTDINO_TOKEN="your-api-key"
npx tdpw upload ./playwright-report
```
Pass the key to the CLI with the `--token` flag:
```bash theme={null}
testdino upload ./test-results --token="your-api-key"
```
Or set it as an environment variable:
```bash theme={null}
export TESTDINO_TOKEN="your-api-key"
testdino upload ./test-results
```
In CI workflows, store the key as a secret and reference it:
```yaml theme={null}
- name: Upload to TestDino
run: npx tdpw upload ./playwright-report --token="${{ secrets.TESTDINO_TOKEN }}"
```
## Set up CI/CD secrets
Never hardcode API keys in your workflow files. Store them as secrets and reference them at runtime.
1. Go to your repository → **Settings → Secrets and variables → Actions**
2. Click **New repository secret**
3. Name it `TESTDINO_TOKEN`
4. Paste your API key
5. Click **Add secret**
1. Go to your project → **Settings → CI/CD → Variables**
2. Click **Add variable**
3. Set Key to `TESTDINO_TOKEN`
4. Paste your API key in Value
5. Check the **Mask variable** to hide it in logs
6. Click **Add variable**
1. Go to **Manage Jenkins → Credentials**
2. Select your domain (or global)
3. Click **Add Credentials**
4. Choose **Secret text**
5. Set ID to `testdino-token`
6. Paste your API key in Secret
1. Go to **Pipelines → Library**
2. Create or open a variable group
3. Add a variable named `TESTDINO_TOKEN`
4. Paste your API key
5. Click the lock icon to make it secret
1. Go to **Project Settings → Environment Variables**
2. Click **Add Environment Variable**
3. Name it `TESTDINO_TOKEN`
4. Paste your API key
## Rotate a key
When a key expires or you suspect it's been exposed:
1. Generate a new key in **Project Settings → API Keys** tab
2. Update your CI secrets with the new key
3. Run one upload to confirm the new key works
4. Revoke or delete the old key
**Tip**
Don't delete the old key until you've confirmed the new one works. This avoids downtime if something goes wrong during the switch.
## Security Practices
* Use short expiration periods for CI keys
* Create separate keys for different pipelines or environments
* Rotate keys if you suspect exposure
* Never commit keys to version control
## Key Limits
| Plan | Keys per project |
| :--------- | :--------------- |
| Community | 2 |
| Pro | 5 |
| Team | 10 |
| Enterprise | Unlimited |
## Next steps
With a key in hand, install a reporter to upload from your machine, or set up CI to upload on every run.
Install the Node.js or Python CLI and run your first upload
Automate uploads in GitHub, GitLab, Azure DevOps, and more
Use an Access Token to query test data over the API
All project configuration
## Use your API key
Pass the key to the CLI with the `--token` flag:
```bash theme={null}
npx tdpw upload ./playwright-report --token="your-api-key"
```
Or set it as an environment variable:
```bash theme={null}
export TESTDINO_TOKEN="your-api-key"
npx tdpw upload ./playwright-report
```
Pass the key to the CLI with the `--token` flag:
```bash theme={null}
testdino upload ./test-results --token="your-api-key"
```
Or set it as an environment variable:
```bash theme={null}
export TESTDINO_TOKEN="your-api-key"
testdino upload ./test-results
```
In CI workflows, store the key as a secret and reference it:
```yaml theme={null}
- name: Upload to TestDino
run: npx tdpw upload ./playwright-report --token="${{ secrets.TESTDINO_TOKEN }}"
```
## Set up CI/CD secrets
Never hardcode API keys in your workflow files. Store them as secrets and reference them at runtime.
1. Go to your repository → **Settings → Secrets and variables → Actions**
2. Click **New repository secret**
3. Name it `TESTDINO_TOKEN`
4. Paste your API key
5. Click **Add secret**
1. Go to your project → **Settings → CI/CD → Variables**
2. Click **Add variable**
3. Set Key to `TESTDINO_TOKEN`
4. Paste your API key in Value
5. Check the **Mask variable** to hide it in logs
6. Click **Add variable**
1. Go to **Manage Jenkins → Credentials**
2. Select your domain (or global)
3. Click **Add Credentials**
4. Choose **Secret text**
5. Set ID to `testdino-token`
6. Paste your API key in Secret
1. Go to **Pipelines → Library**
2. Create or open a variable group
3. Add a variable named `TESTDINO_TOKEN`
4. Paste your API key
5. Click the lock icon to make it secret
1. Go to **Project Settings → Environment Variables**
2. Click **Add Environment Variable**
3. Name it `TESTDINO_TOKEN`
4. Paste your API key
## Rotate a key
When a key expires or you suspect it's been exposed:
1. Generate a new key in **Project Settings → API Keys** tab
2. Update your CI secrets with the new key
3. Run one upload to confirm the new key works
4. Revoke or delete the old key
**Tip**
Don't delete the old key until you've confirmed the new one works. This avoids downtime if something goes wrong during the switch.
## Security Practices
* Use short expiration periods for CI keys
* Create separate keys for different pipelines or environments
* Rotate keys if you suspect exposure
* Never commit keys to version control
## Key Limits
| Plan | Keys per project |
| :--------- | :--------------- |
| Community | 2 |
| Pro | 5 |
| Team | 10 |
| Enterprise | Unlimited |
## Next steps
With a key in hand, install a reporter to upload from your machine, or set up CI to upload on every run.
Install the Node.js or Python CLI and run your first upload
Automate uploads in GitHub, GitLab, Azure DevOps, and more
Use an Access Token to query test data over the API
All project configuration