

The Slack App posts test run results to Slack channels and users. A project holds a list of notifications, and each one decides when it sends, which test cases it lists, and where it goes.
Quick Reference
Connect Slack
In Project → Integrations → Slack App, click Connect to Slack and complete the OAuth (open authorization) flow. After connecting, the Slack App card shows the connected status with your workspace name.

Add a notification
Click the ⚙️ icon on the Slack App card to open the Slack Notification Configuration dialog. It lists every notification on the project. Click New to add one, or select an existing notification to edit it.1
Pick a type
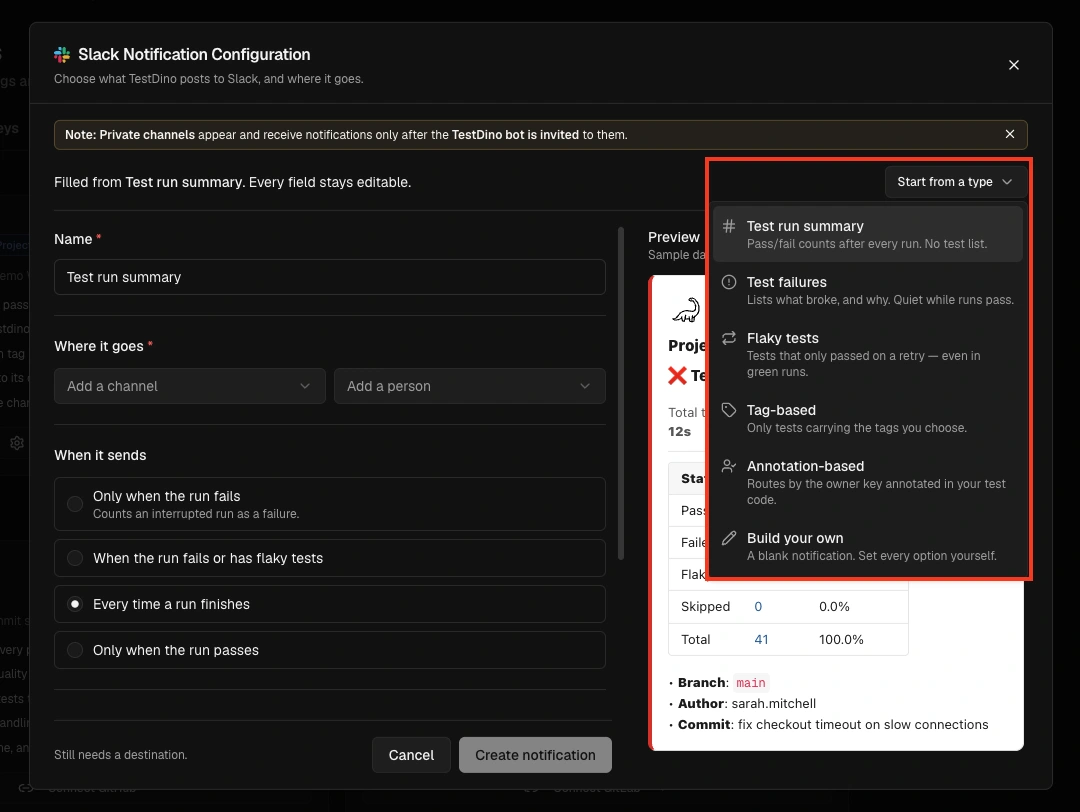
Open Start from a type in the editor header and choose one of the 6 types below. Each arrives prefilled, so the only field you have to supply is the destination. Pick Build your own to start from a blank notification instead.
2
Set where it goes
Under Where it goes, pick one or more Slack channels and users. A notification can target channels and people at the same time.
3
Adjust the rest
Every prefilled setting stays editable. Change when it sends, which test cases it lists, or which runs it applies to.
4
Check the preview
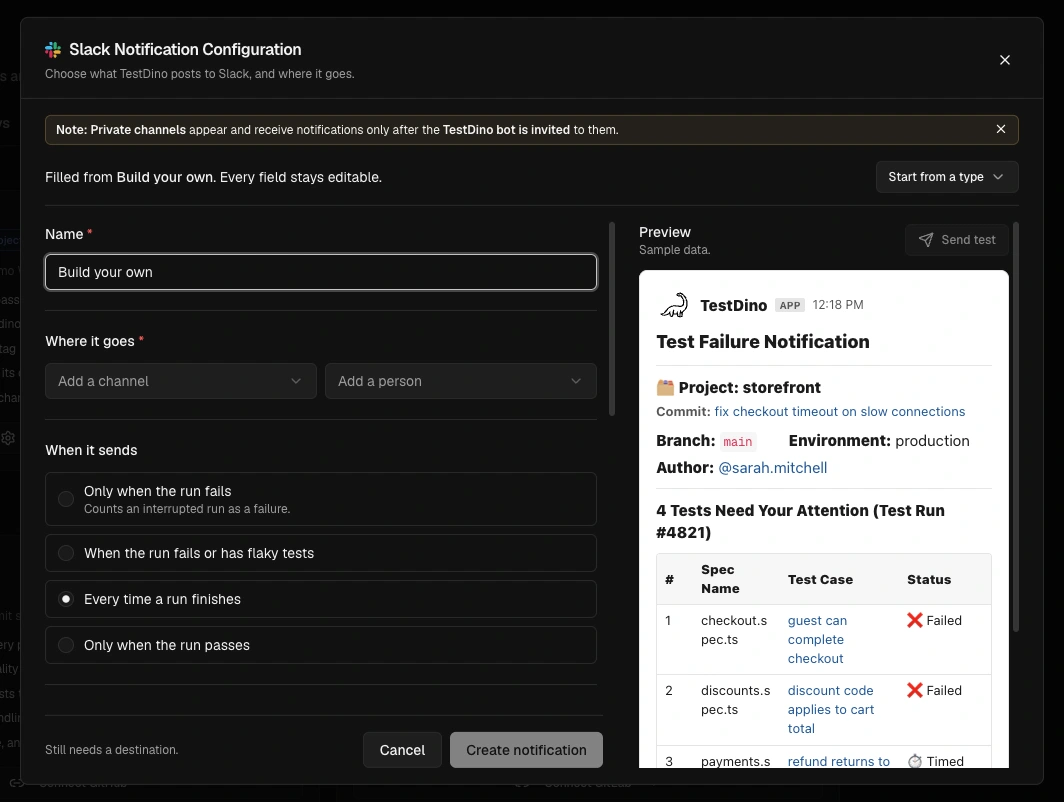
The preview pane renders the exact Slack message as you edit. It runs on demo data, so it works on a project that has never uploaded a test run. If the notification would not send, the preview names the condition that stopped it.
5
Save, then send a test
Save the notification, then use Send test to post a real message to every destination on it.
Who can editAdding, editing, and deleting notifications requires the Organization Admin or Owner role. Everyone else sees the notification list in read-only mode.
Notification types
Each type is a starting point, not a fixed mode. After picking one, every setting stays editable.
Tag-based needs at least one tag and Annotation-based needs an annotation key. The other 4 are ready to save once a destination is set.
Start from a type stays available while you edit, so you can refill the form from a different type at any point. Filling from a type overwrites every field. If the notification has unsaved edits, it asks before replacing them.
Configure a notification
The editor groups every setting into these sections.
A Test run summary carries no test list, so Which tests it lists, Extra detail in the message, and Message details do not apply to it.
When it sends
Which tests it lists
Include which results decides which matching test cases reach the message.
Two chip fields narrow the list further: Include tests tagged and Skip tests tagged.
Extra detail in the message
Both switches are off by default:- Show each test’s tags adds a Tags column.
- Show the first line of each error adds an Error column.
Limit it to certain runs
Only these branches and Only these environments restrict a notification to a subset of runs. Leave them empty to cover every run. Environments come from Branch Environment Mapping, which maps Git branches to environments such as Production, Staging, and Dev. Scope a notification to an environment when the same tests should reach different people depending on where they run:@critical on Production to #incident-response, @smoke on Staging to #qa-review.
Match tests by tag
Tag your Playwright tests, then add those tags under Include tests tagged. Tags must carry the leading@ and match your test tags exactly.
checkout.spec.ts
@quarantine.
Route by annotation
The Annotation-based type matches a test case whose annotation type or description equals the Annotation key you set, so the owner named in your test code receives the alert.login.spec.ts
testdino:notify-slack, then pick the Slack channels or users under Where it goes. To reach different people from different annotation values, add one notification per key. See the Annotations guide for every supported annotation type.
Verify a notification
Two checks confirm a notification before you rely on it:- Preview: the editor renders the exact Slack message as you change settings, on demo data. When a setting would stop the notification from sending, the preview names that condition.
- Send test: posts a real Slack message to every destination on the notification. On a partial failure it reports which destination failed and why, for example
Sent to 1 of 2. #alerts: Invite @TestDino to that channel first.
Limits
How It Differs from Slack Webhook
The Slack App holds a list of notifications per project. Each one targets its own channels and users, fires on its own run outcomes, lists its own selection of test cases, and can be limited to certain branches and environments. The Slack Webhook sends all notifications to a single channel. It does not support multiple notifications, per-notification destinations, branch or environment limits, tag matching, or annotation routing.Troubleshooting
No messages appearing in Slack
No messages appearing in Slack
- Verify the Slack App is connected in Project → Integrations → Slack App
- Confirm the project has at least one saved notification with a destination under Where it goes
- Open the notification and read the preview. If a setting would stop it from sending, the preview names that condition
- Use Send test to post a real message to every destination
- Confirm a test run has completed after connecting (messages are sent on run completion)
Private channel not appearing in channel list
Private channel not appearing in channel list
- Private channels require the TestDino app to be added to the channel first. To add it:
- Open the private channel in Slack
- Click the channel name at the top to open channel details
- Go to the Integrations tab → click Add an App
- Search for TestDino. If you have already completed the OAuth connection, it appears under In Your Workspace. If not, it shows results from the Slack Marketplace. Complete the OAuth connection in TestDino first before adding the app to private channels.
- After adding TestDino to the channel, click the Refresh button in the TestDino Slack settings to fetch the updated channel list
Send test reports Sent to 1 of 2
Send test reports Sent to 1 of 2
- Send test posts to every destination on the notification, so a partial result means one destination rejected the message
- Read the reason next to the named destination.
Invite @TestDino to that channel firstmeans the bot is not a member of that private channel - Add the bot to the channel, then run Send test again
Messages going to the wrong channel
Messages going to the wrong channel
- Each notification posts only to the channels and users listed under Where it goes. There is no fallback channel
- Open the notification list and check the destinations on each one. A second notification with an overlapping selection posts its own message
- Use Send test on a single notification to confirm where that one lands
Tag or annotation notification not firing
Tag or annotation notification not firing
- Confirm the run contains test cases matching the notification. A run with no matching test cases sends nothing
- Tags must match exactly, including the leading
@(for example@smoke, notsmoke) - With Match these tags exactly on, a test case carrying any extra tag is skipped. Turn it off to match on any of the chosen tags
- For an annotation notification, confirm the Annotation key equals the annotation type or description in your test code
- Check When it sends. A notification set to Only when the run fails stays quiet on a passing run
- Check Only these branches and Only these environments. A run outside those lists is skipped
Cannot add or edit a notification
Cannot add or edit a notification
- Adding, editing, and deleting notifications requires the Organization Admin or Owner role
- Without it, the notification list is read-only
OAuth connection failed
OAuth connection failed
- Ensure you have permission to install apps in the Slack workspace
- Try removing the TestDino app from Slack → Settings → Manage Apps and reconnecting from TestDino
Annotations Guide
Add metadata and Slack notification targets to tests

Slack Webhook
Single-channel webhook notifications