What you’ll learn
- How the dual-panel Automation view works
- How to switch between Hierarchy and Flatten views, search, sort, and filter
- How to link tests via drag-and-drop, Auto-Match, and Auto-Generate
- The recommended workflow for building full test traceability
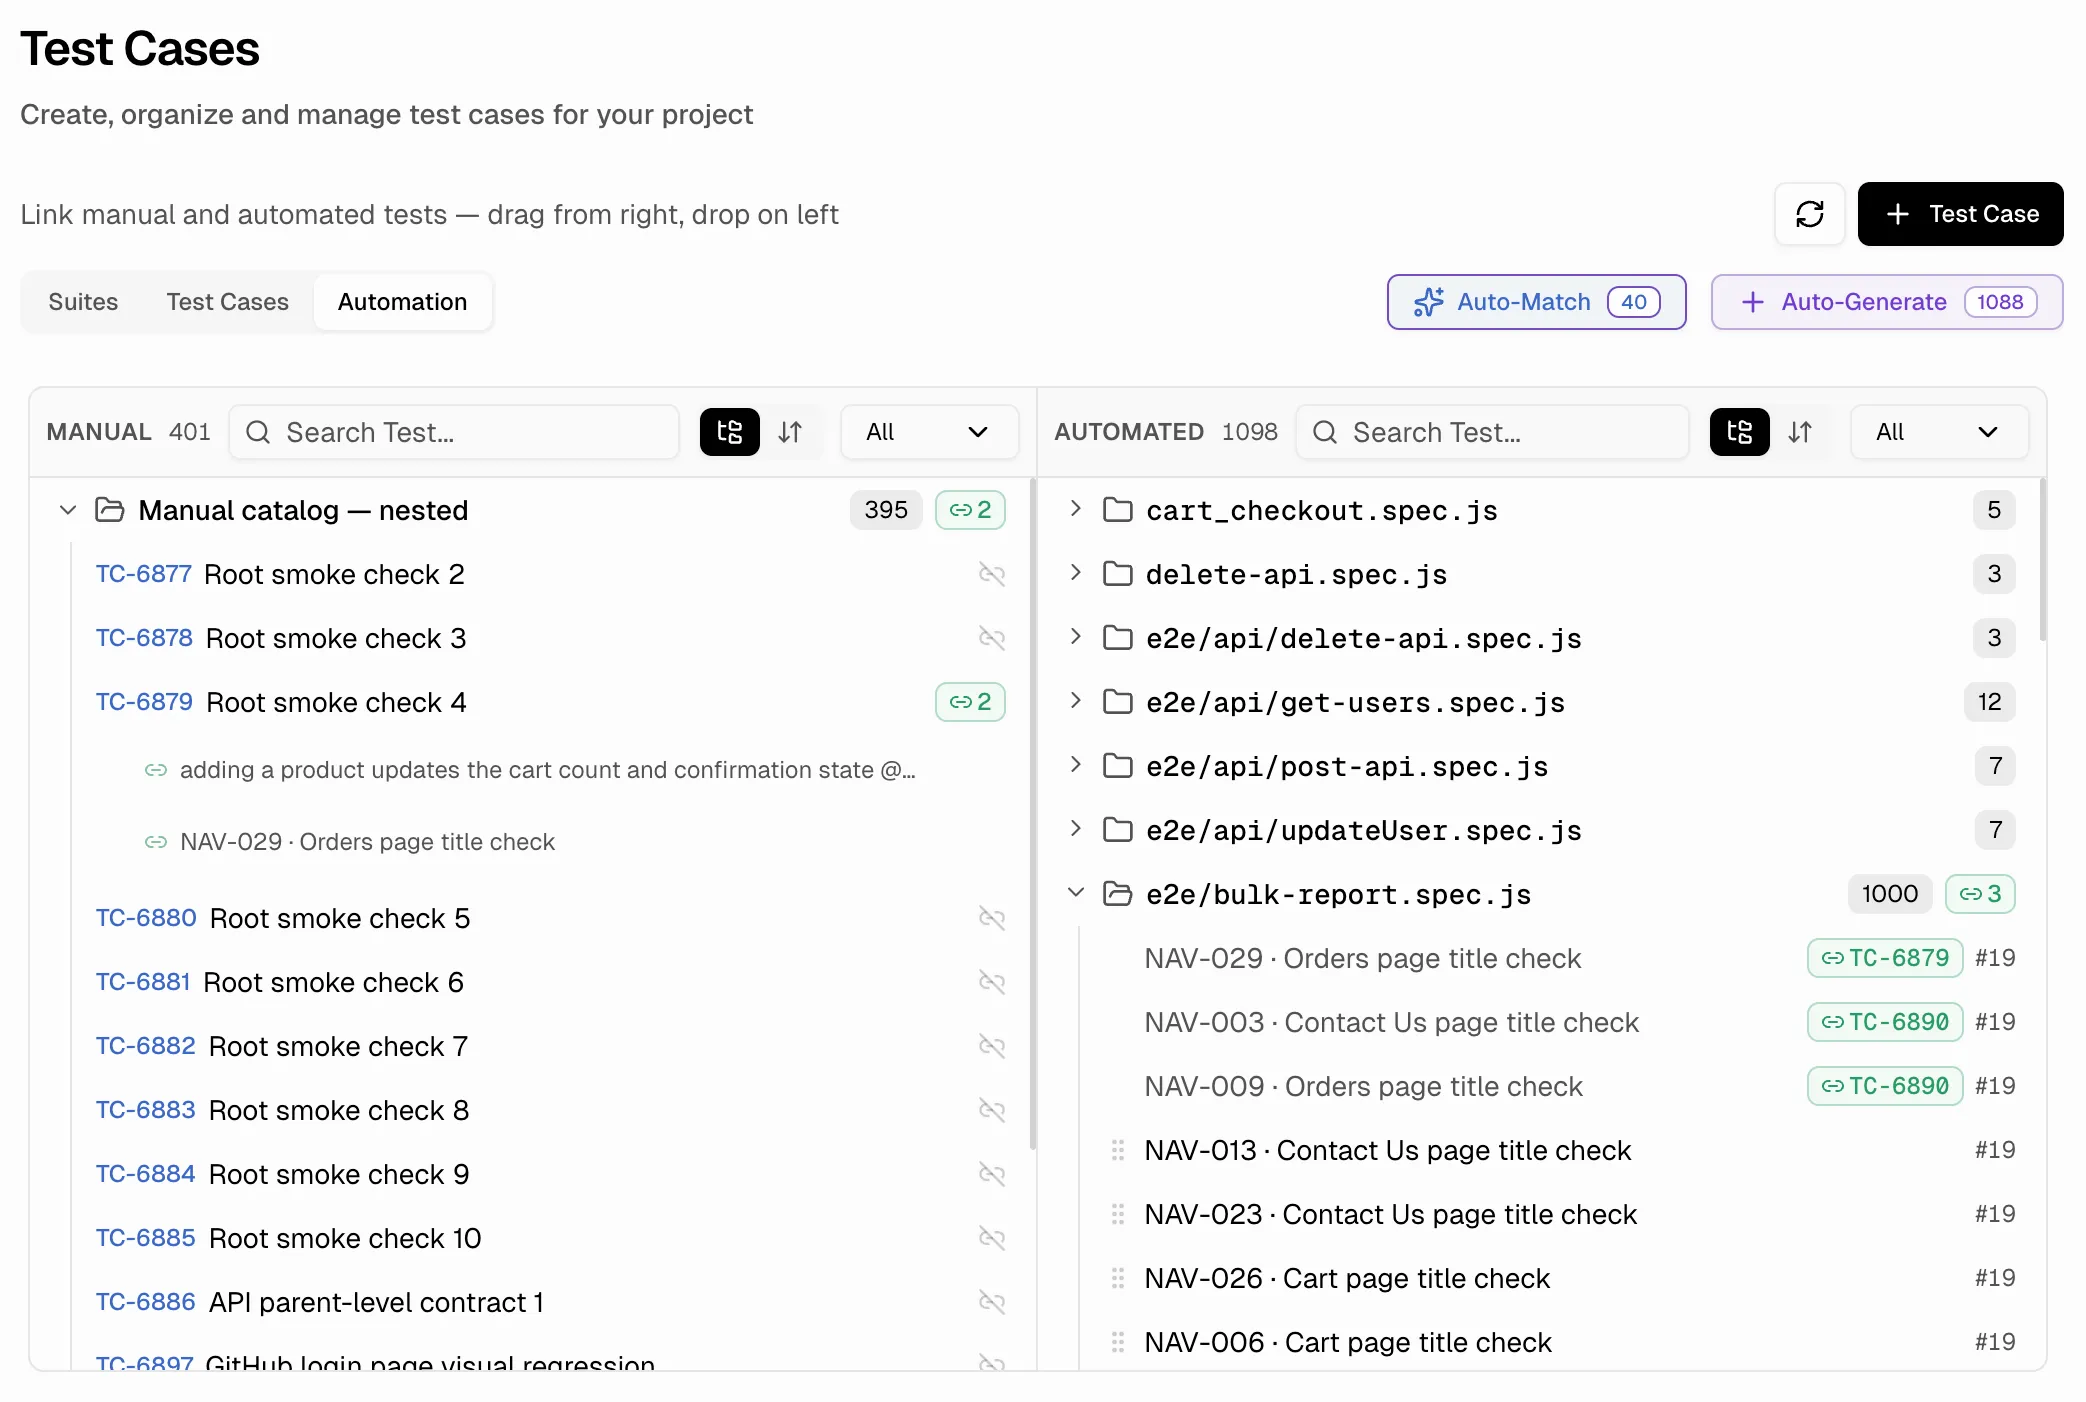
Layout
The screen is split into two side-by-side panels:| Panel | Content |
|---|---|
| Left — MANUAL | Your manual test cases, grouped by suite. Shows the total count (e.g., “MANUAL 42”). |
| Right — AUTOMATED | Automated tests discovered from your CI runs, grouped by spec file. Shows the total count (e.g., “AUTOMATED 1098”). |
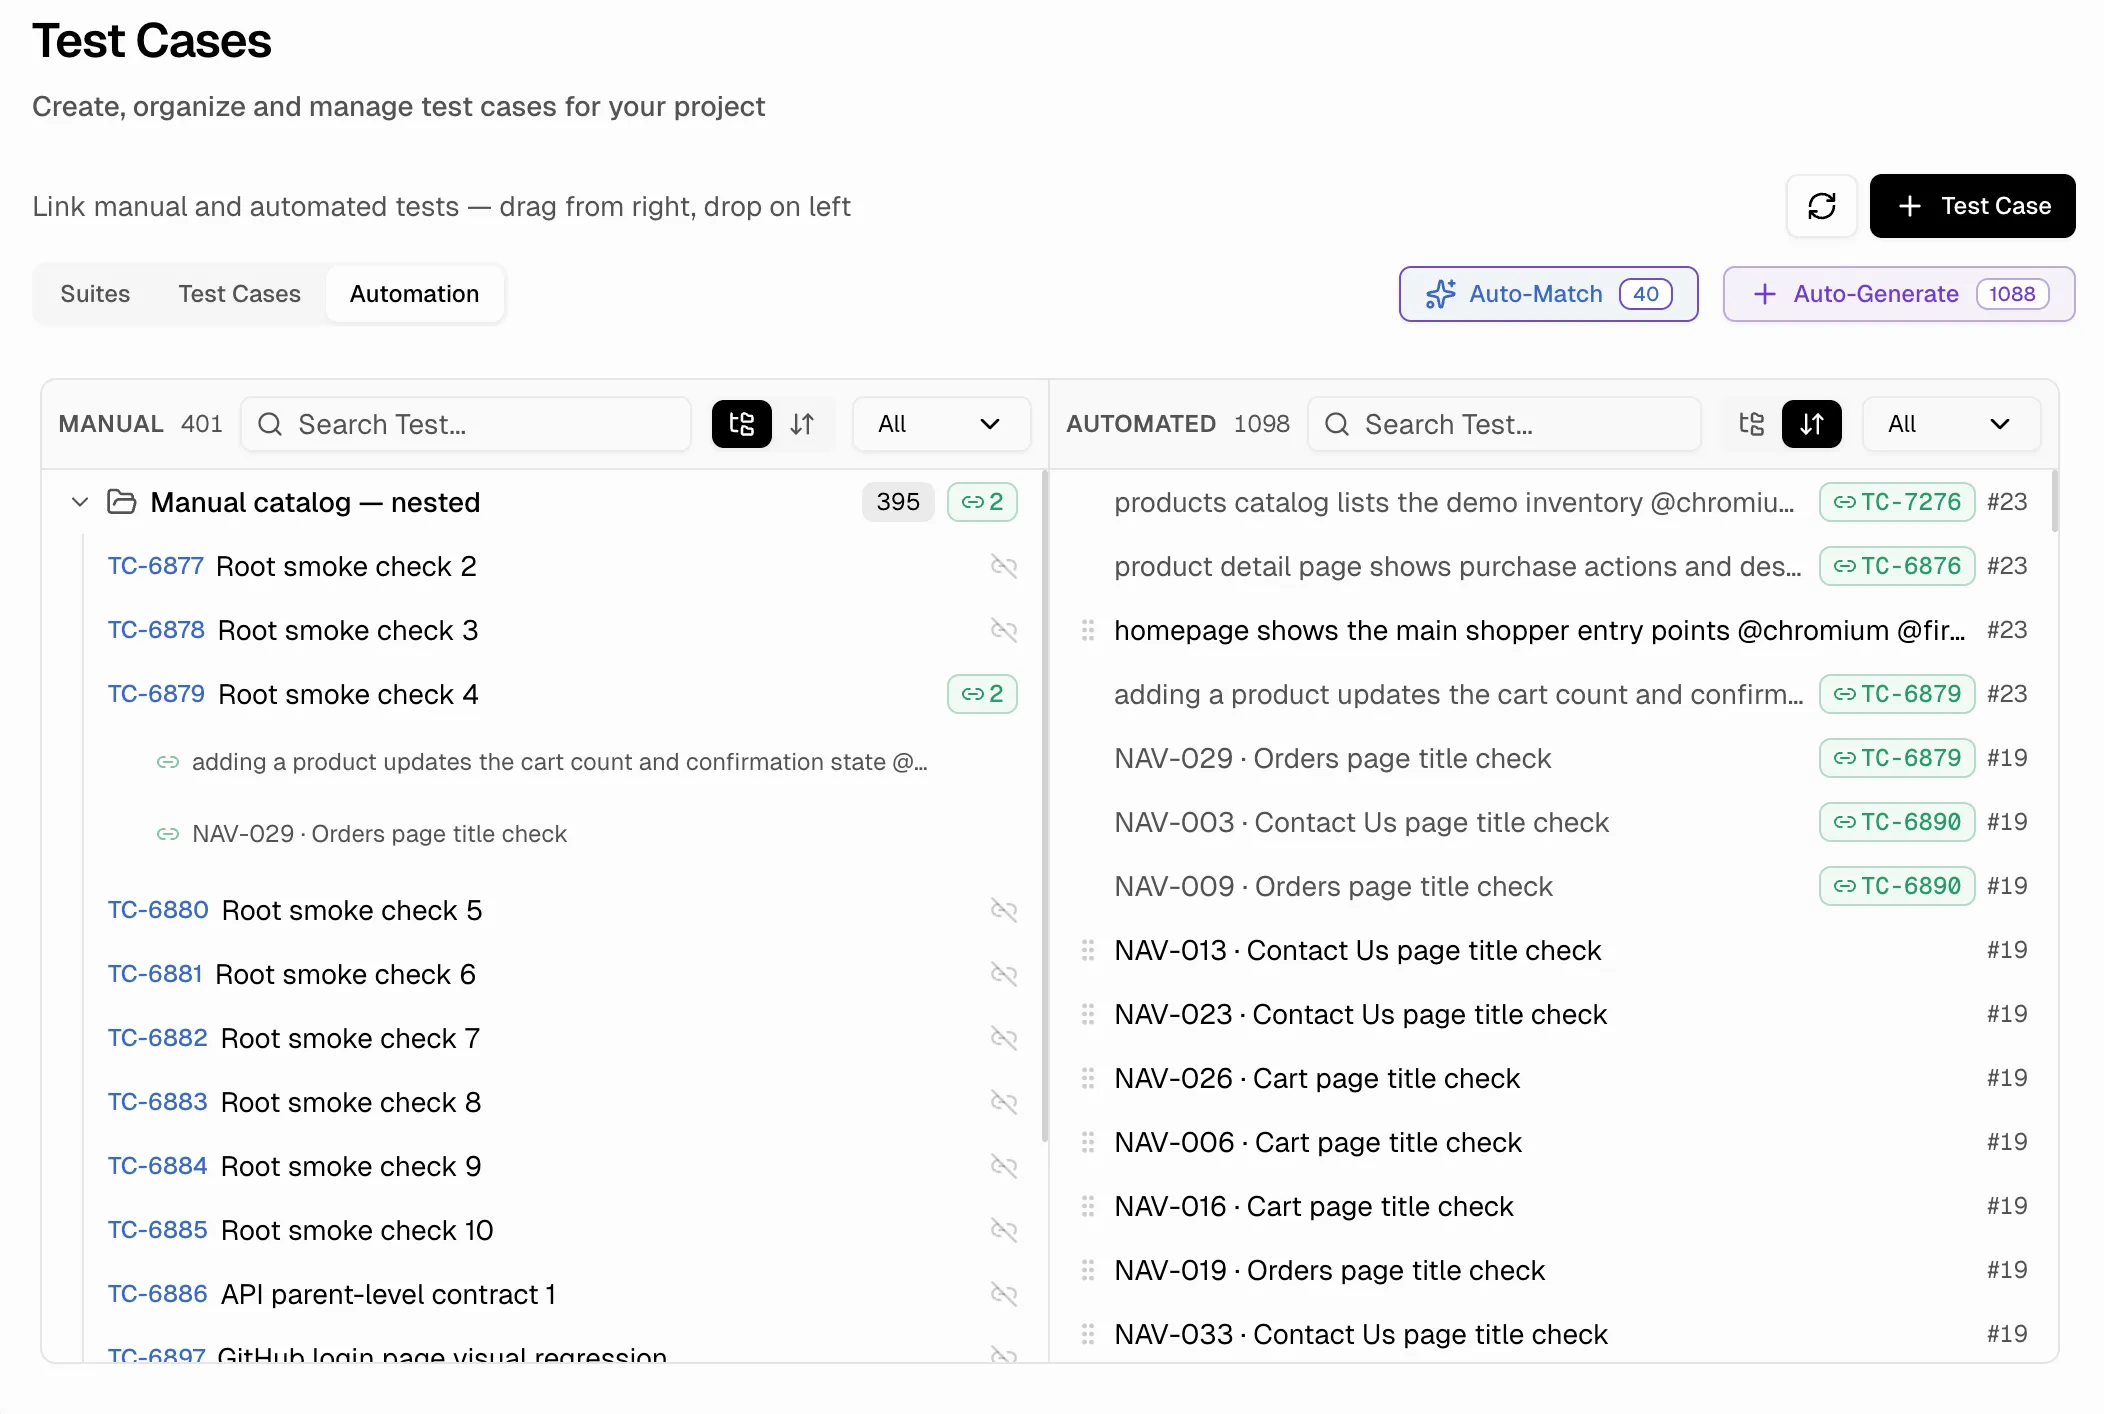
Panel Views
Hierarchy vs Flatten
| View | What It Shows |
|---|---|
| Hierarchy | Tests grouped by suite (manual panel) or spec file (automated panel), shown as a collapsible tree |
| Flatten | All tests in a flat list, sorted by case ID or test name |
Search
Each panel has a search bar at the top. Type to filter tests by name within that panel. The search applies independently — searching in the manual panel does not affect the automated panel.Sort
Reorder the list within each panel using the sort control in the toolbar.Filter by Link Status
The filter dropdown on each panel controls which tests are visible:| Filter | What It Shows |
|---|---|
| All | Every test in the panel |
| Linked | Only tests that are already linked to a counterpart |
| Unlinked | Only tests that are not yet linked |
TipUse Unlinked on both panels to see your coverage gaps: unlinked manual tests that need automation, and unlinked automated tests that need a manual test case.
Link and Unlink Tests
Two ways to link automated tests to manual test cases:- Drag-and-drop in Automation view — Drag a test from the right (AUTOMATED) panel and drop it onto a manual test case in the left (MANUAL) panel. Linked tests show a badge (e.g.,
TC-6835 #23). To unlink, click the ✕ icon on the linked test badge.
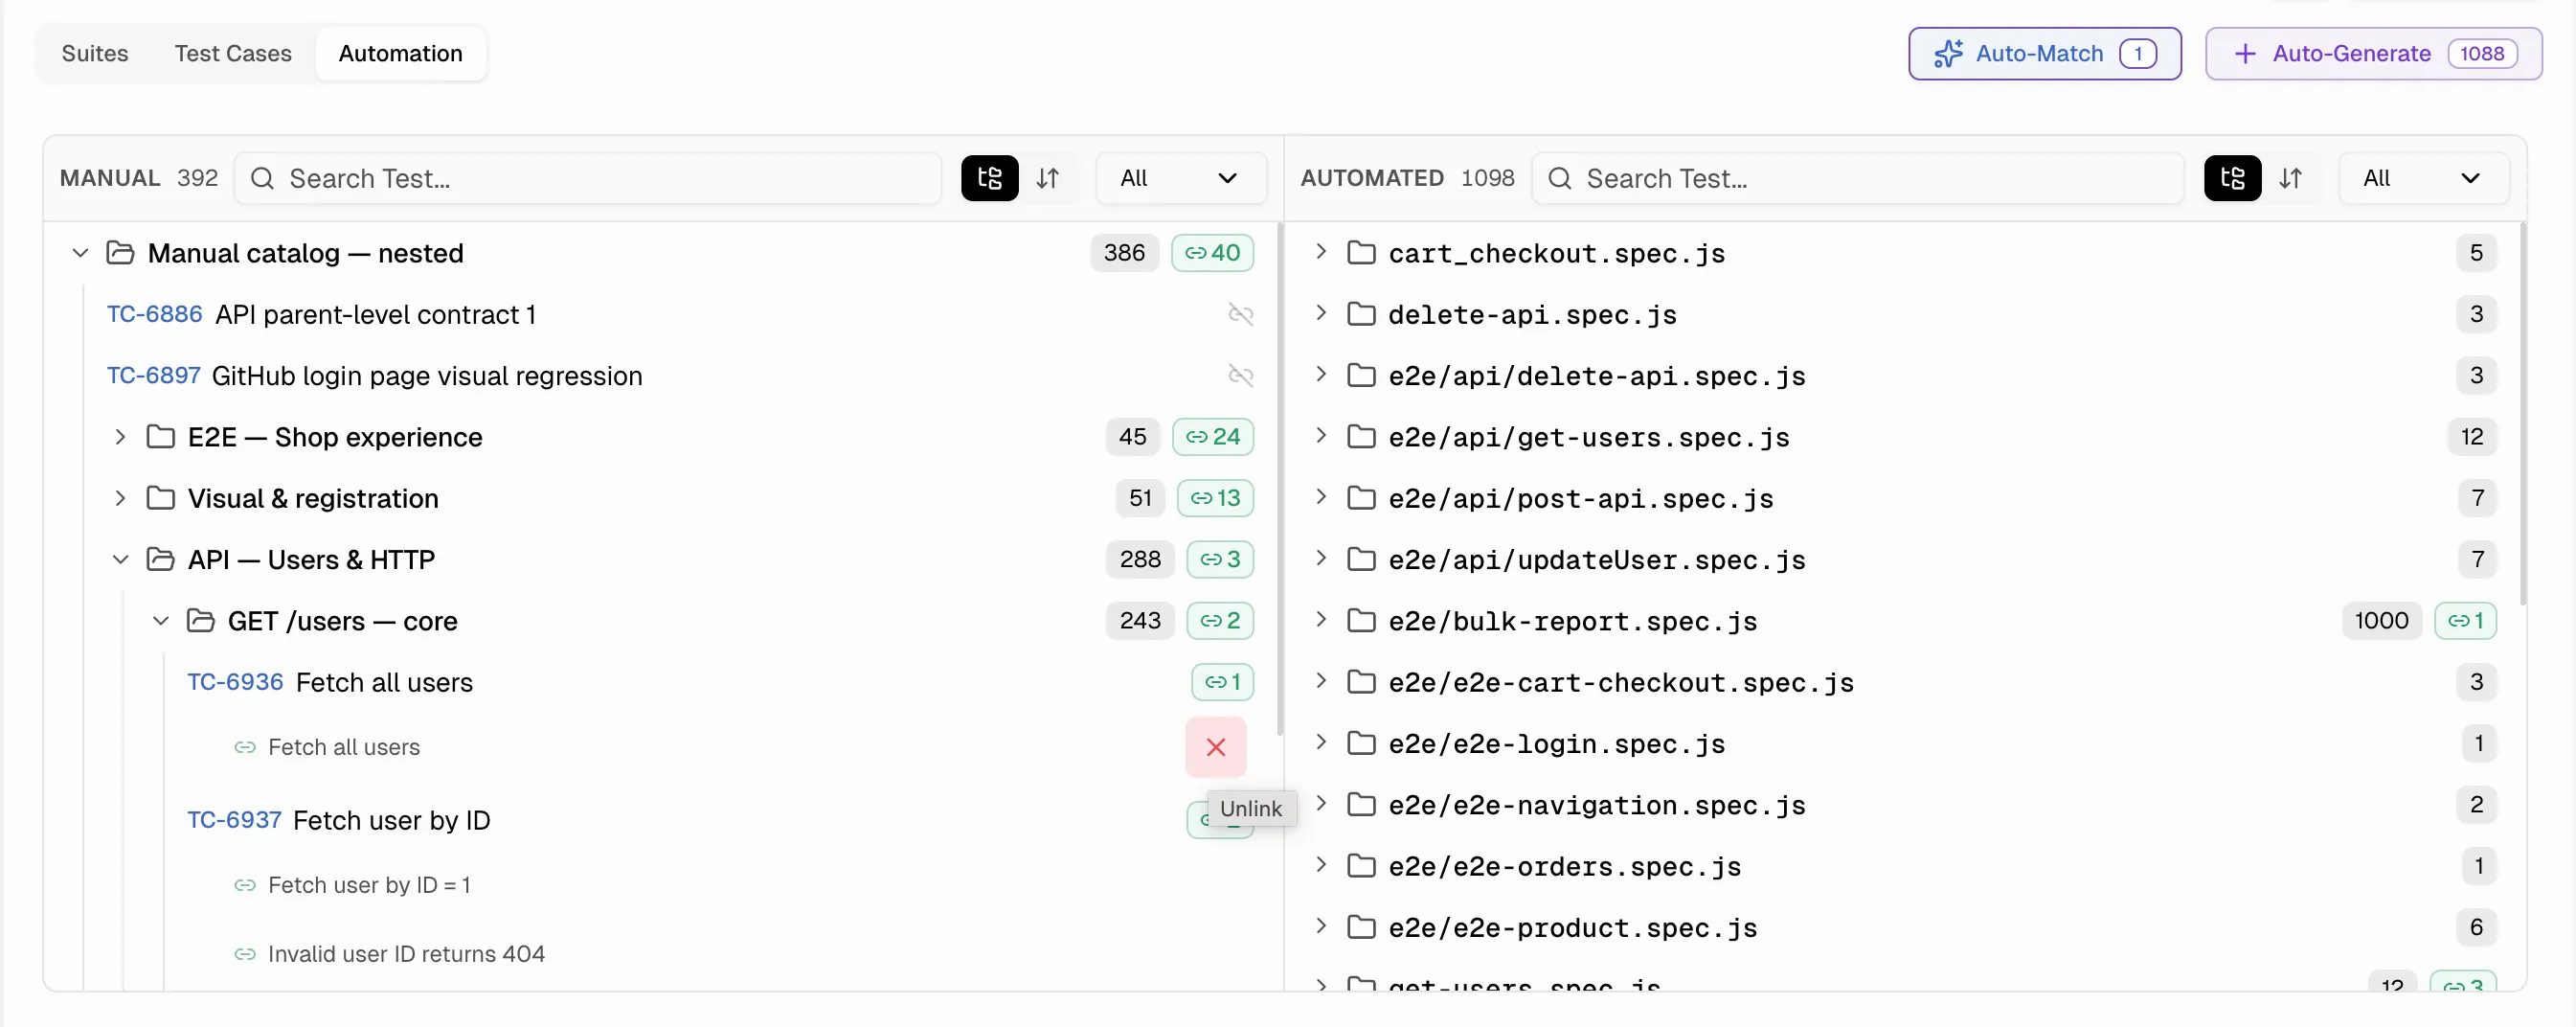
- From the test case Details Sheet — Open any test case and use the Linked Tests tab to search, link, and unlink automated tests individually.
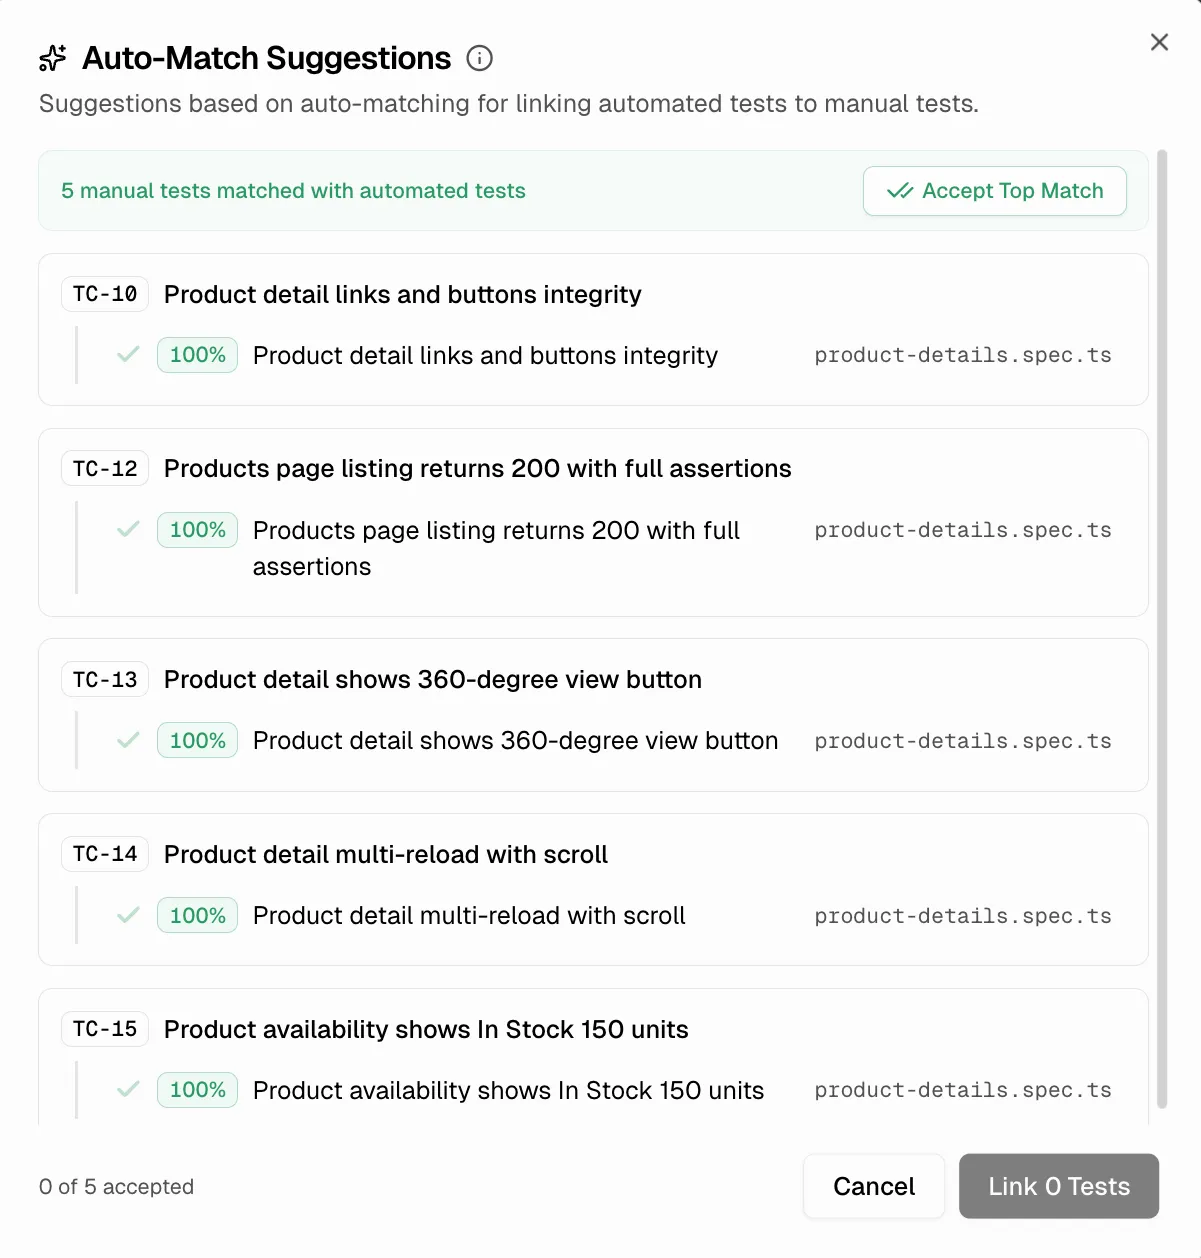
Auto-Match
Auto-Match uses AI to find automated tests that likely correspond to your manual test cases based on title similarity.How to use
- Click the Auto-Match button in the toolbar. The badge shows how many suggestions are available (e.g., “39”).
- The Auto-Match Suggestions dialog opens, showing each manual test case with its top matching automated tests.
- Each suggestion shows:
- The manual test case ID and title
- Candidate automated tests ranked by match score (e.g., 92%, 100%, 76%)
- The spec file each automated test belongs to
- A green checkmark for accepted matches
- Review the suggestions. Toggle individual matches on or off by clicking the checkmark.
- Click Accept Top Match to accept the highest-scoring match for every test case at once.
- Click Link N Tests to apply the accepted matches.
Match Scores
| Score | Confidence | Action |
|---|---|---|
| 90-100% | Very high — titles are nearly identical | Accept confidently |
| 70-89% | Good — titles share significant overlap | Review before accepting |
| Below 70% | Low — titles have limited similarity | Review carefully, may be incorrect |
TipStart with Accept Top Match to handle the high-confidence matches, then review the remaining suggestions individually.
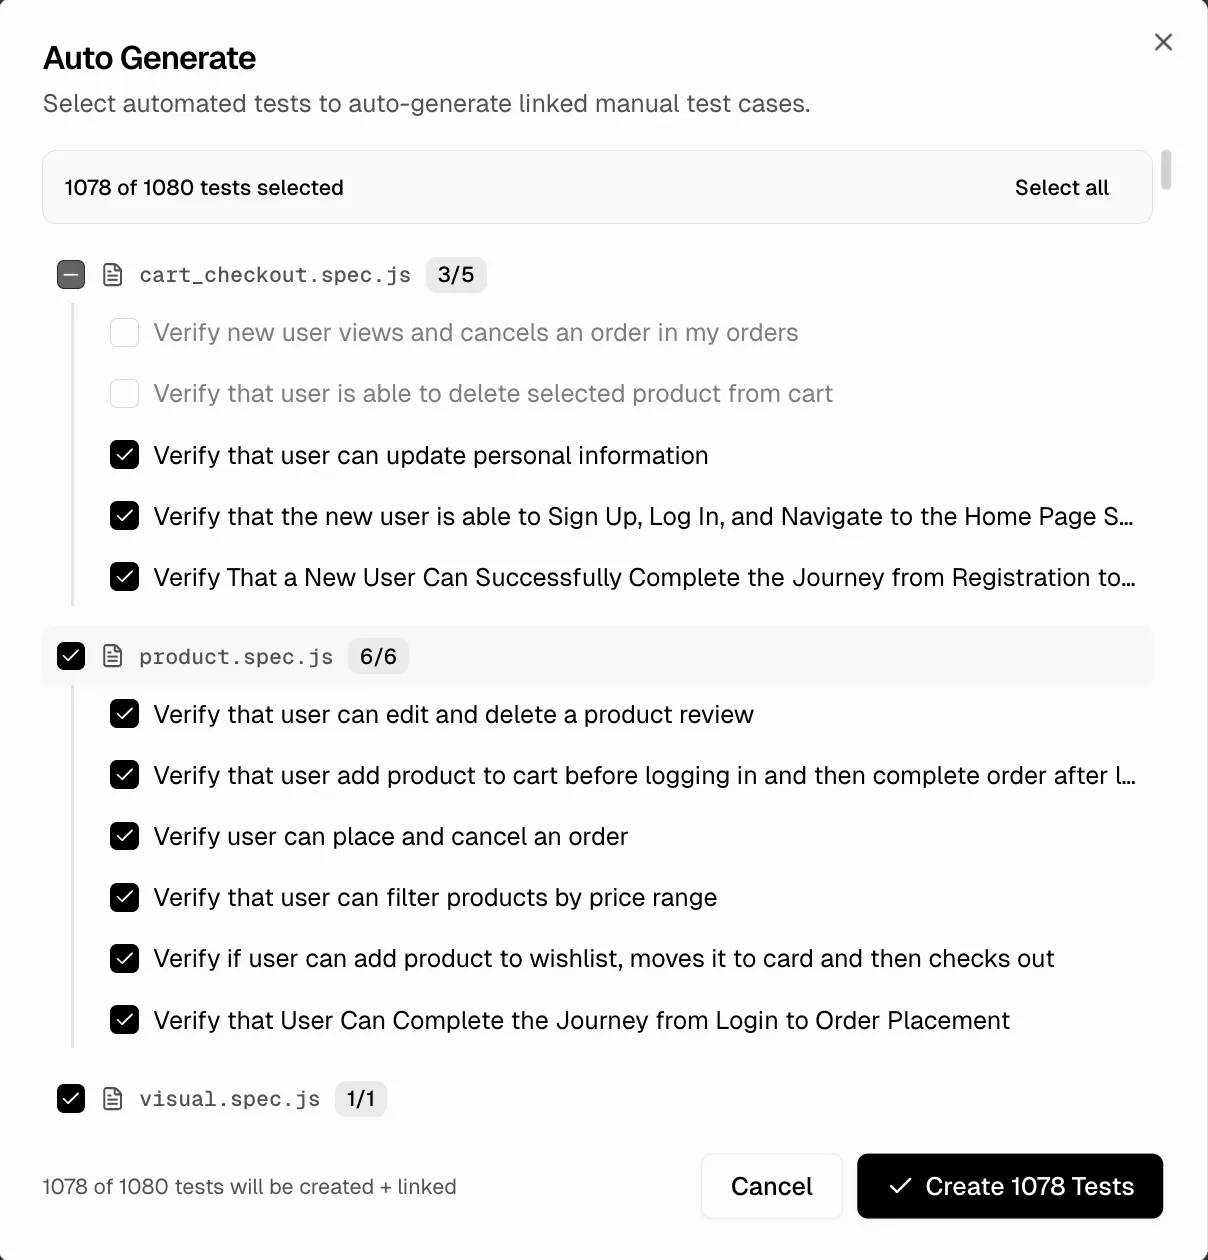
Auto-Generate
Auto-Generate creates new manual test cases from unlinked automated tests and links them automatically. This is useful when you have automated tests in your CI pipeline but no corresponding manual test cases yet.How to use
- Click the Auto-Generate button in the toolbar. The badge shows how many eligible automated tests are available (e.g., “1074”).
- The Auto-Generate dialog opens, showing all unlinked automated tests grouped by spec file.
- Each spec file group shows:
- The spec file name and count (e.g.,
product.spec.js 8/8) - Individual test names with checkboxes
- The spec file name and count (e.g.,
- Select or deselect individual tests, entire spec files, or use Deselect all / select all.
- Click Create N Tests to generate the manual test cases and link them.
What gets created
Each generated test case:| Field | Value |
|---|---|
| Title | Uses the automated test’s title |
| Suite | Assigned based on the spec file name |
| Automation Status | Set to “Automated” |
| Linked Test | Automatically linked to the source automated test |
Typical Workflow
- Start in Automation view to see the current link status across both panels
- Use Auto-Match first to link existing manual test cases to their automated counterparts
- Use Auto-Generate to create manual test cases for any remaining unlinked automated tests
- Use drag-and-drop for any manual corrections or one-off links
- Switch to the Linked filter to verify coverage, or Unlinked to see gaps
ImportantAutomated tests only appear in the right panel after test runs have been uploaded to TestDino — either executed locally and uploaded via the CLI, or reported automatically from your CI pipeline.
Test Cases
List view, details sheet, and linked tests
Concepts & Settings
Field definitions and project settings
Bulk Actions
Edit, delete, or print multiple test cases
CI Setup
Configure your pipeline to report automated tests